Well...how about lower Price...
Announcement Date: April 7, 2011
96X0 Series IP Deskphones: Price Change Notification (Global)
Re: Increase in Global Price List on Original 96X0 Series IP Deskphones
Over the past several months, Avaya has made significant announcements in the desktop and collaboration area including new models in the Avaya 96X1 Series line of IP Deskphones (9601, 9608, 9611G, 9621G and 9641G), delivering higher value and better productivity at competitive price points.
With the successful introduction of the new 96X1 phones and given the original models are reaching a mature point in their product lifecycle—Avaya will increase the price of the original 96X0 models in 2011. (See Table 1). Avaya will continue to sell and support the original 96X0 models for customers who now have these models deployed or are in the midst of a rollout. However, for future purchases and rollouts, all customers are encouraged to evaluate the new 96X1 series models. The new 96X1 series models retain a similar appearance, user experience and management structure, minimizing the impact for customers who may be upgrading and/or mixing original and new models.
New Global Price List for Original 96X0 Models - 2011
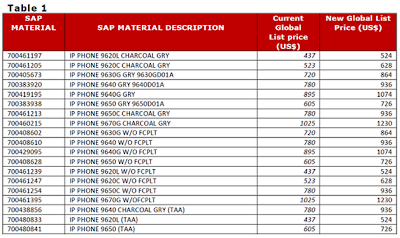
Going forward, no special pricing consideration will be offered by Avaya for the products identified within Table 1.
More Value, Lower Cost with New 96X1 Models
Introduced in September, 2010, the new models of the Avaya 96X1 Series IP deskphones extend the capabilities of the 96X0 portfolio to include more color, integrated gigabit and touch screen models. Competitively priced, these phones deliver the features that customers have told us they need in a deskphone in order to drive increased productivity across their organizations.
For any additional questions regarding the pricing change, please contact PacketBase.
Tuesday, April 26, 2011
Friday, April 8, 2011
How to configure the Avaya 3641/3645 IP Wireless Telephone?
Avaya 3645 & 3641 IP Wireless Telephone - Enter the Phone Configuration.
• With the Wireless Telephone powered OFF, simultaneously press and hold the green [Power On / Start Call] and red [Power Off / End Call] keys.
• After hearing two beeps, release the green [Power On / Start Call key], then release the red [Power Off / End Call key].
• Enter the 3641/3645 Admin Password [default = 123456] and press the OK button (middle).
1. Enter the IP Address of the Phone. In the Admin menu that appears, select Network Config and press the OK button. In the Network Setup menu that appears, select IP Addresses and press the OK button. Select Static and press the OK button.
2. Complete the IP Address Configuration. In the Static IP menu that appears, select Phone IP. Enter a unique IP Address on the S8300 subnet and press the OK button followed by the Softkey D (Back) button.
3. Configure the Default Gateway. In the Static IP menu that appears, select Default Gateway and press the OK button. Enter the G350 LAN IP Address and press the OK button followed by the Softkey D (Back) button.
4. Enter the Subnet Mask. In the Static IP menu that appears, select Subnet Mask and press the OK button. Enter the Subnet Mask and press the OK button followed by the Softkey D (Back) button.
5. Enter the Call Server IP Address. In the Static IP menu that appears, select Call Server IP and press the OK button. Enter the S8300 IP Address and press the OK button followed by the Softkey D (Back) button.
6. Enter the AVPP IP Address. In the Static IP menu that appears, select AVPP IP Address and press the OK button. Enter the AVPP IP Address and press the OK button followed by the Softkey D (Back) button.
7. Enter the OAI IP Address. In the Static IP menu that appears, select OAI Server IP and press the OK button. Enter the IP Address of the NetLink OAI Gateway server and press the OK button followed by the Softkey D (Back) button.
8. Set the ESSID information. In the Network Setup menu, select ESS ID. In the ESS ID screen, enter the ESSID that was administered on the Avaya AP-8 (the Network Name field in Step 1 of Section 6). Press the OK button followed by the Softkey D (Back) button.
9. Set the Security Key. In the Network Setup menu, select Security and press the OK button. In the Security screen, select WPA-PSK. In the WPA-PSK menu that appears, select Passphrase and press the OK button. In the Passphrase screen that appears, the Passphrase to enter must match the Passphrase set on the AVPP in Step 2 of Section 6. Press OK, press Softkey D (Back) until the Admin menu is reached.
10. Enable OAI on the Phone. In the Admin menu, select Phone Setup. In the Phone Setup menu select Enable OAI. Select Enable and press the OK button, then press the Softkey D (Back) twice. The label changes from Back to Exit after the first push. This will exit administration mode and register the phone to Avaya Communication Manager. The user is prompted for the Extension Number and Password at this point.
11. Configure the Ring options. Press Softkey B (Prof). Select any option except Off and press the OK button.
Purchase Recommendations:
1. Enter the IP Address of the Phone. In the Admin menu that appears, select Network Config and press the OK button. In the Network Setup menu that appears, select IP Addresses and press the OK button. Select Static and press the OK button.
Purchase Recommendations:
- Avaya 3645 IP Wireless Telephone ON SALE: http://shop.packetbase.com/700430416
- Avaya 3641 IP Wireless Telephone ON SALE: http://shop.packetbase.com/700430408
Subscribe to:
Posts (Atom)